
Essentially, exposure is the light your camera turns into an image. It’s determined by the brightness of the light, the amount of time it hits the camera’s sensor, and the ISO “sensitivity” of the sensor. Every exposure is controlled by aperture, shutter speed, and ISO. These three settings together are sometimes called the “exposure triangle”. I’ve already posted about aperture, given as an f-stop number, and I’ve also given an introduction to shutter speed. Future posts will talk about ISO, and go into more detail about how to use the shutter speed setting. I will also give more information about the sensor, which is the thing being exposed to the light. For now, just be aware that these three settings control exposure, and if you change one of them, the others can be adjusted to compensate.
Exposure Value
When we talk about an “amount” of light, we’re talking about brightness and duration. In photography, the relative amounts of light are quantified as Exposure Value (EV), also called stops. When the amount of light doubles, it has increased by 1 EV, or 1 stop. When the amount of light is cut in half, the EV has gone down by 1. When you open up the aperture by one stop, you change the f-stop of the lens so that it allows twice as much light to enter. As the amount of light changes, your camera settings have to change correspondingly if you want to maintain the same exposure. Different combinations of aperture, shutter speed, and ISO are used to adjust the exposure.
If your camera is in fully automatic mode, its computer decides all three settings, and sets them to maintain a generically “proper” exposure, if it can. But if you want to control how the image will look, and get away from purely generic images, you will have to take over one, two, or all three of the exposure triangle settings. For example, if you close down the aperture by one stop to get greater depth of field, you could then slow down the shutter speed by one stop to compensate. Or you could increase the ISO by one stop for an equivalent exposure. Or you could slow the shutter by a half-stop, and increase the ISO also by a half-stop, to make up the one-stop difference in aperture to maintain the equivalent exposure. Which adjustments you make will be determined by how you want the resulting image to look, because each of the three settings of the exposure triangle affect the image in different ways. Aperture affects the depth of field, shutter speed affects how motion will appear, and ISO affects the graininess or noise in the image.
When you make an exposure, light hitting the sensor is converted to an electronic signal (yay physics!), which is then processed and stored in your memory card. Each tiny, itty-bitty area of the rectangular sensor generates a tiny piece of your image, called a pixel. (I’m glossing over some technical details, involving how colors are handled, and I plan to get into some of those details later, when I talk about the sensor in more depth. But for this overview, just think of a pixel as a number, derived from the light striking a bitty little square in the sensor.) The electronic signal can be amplified, effectively increasing the sensitivity of the sensor, and that increase is controlled by the ISO setting. (In film photography, this is called the speed of the film, and modern electronic ISO settings are intentionally calibrated to correspond to the traditional film numbers.)
Over & Under Exposure
Exposure problems are caused by too much light, or too little, hitting a particular area of the sensor. Too much light results in overexposure: the number value associated with a pixel is limited; when it’s as big as it can be, it can’t get any bigger. In that case, information is lost. On the other hand, when there’s not enough light, the pixel value is “zero”, and can’t get any smaller, so information is also lost. Lost information, in this case, means lost detail and definition in the final image. Overexposed areas will be completely white, and underexposed areas will be completely black. In either case, no amount of magical software processing in any image editor will be able to do anything with those portions of the image: if the information just isn’t there, you won’t be able to see anything. And that’s usually not what you want, is it?
The Eyes Have It
In a scene you want to shoot, there will be different levels of brightness in different areas. (There had better be, or it’s going to be a pretty uninteresting photo.) You can’t rely on your eyes, looking directly at the scene or through the camera’s viewfinder, to tell you what might end up being over- or underexposed, because, to put it simply, your eyes and brain are enormously better at seeing different levels of light than your camera is. The range of dark-to-light contrast in a scene is called the dynamic range, and is usually expressed in stops. (Remember that one stop down is half as much light, and one stop up is twice as much light.) The human eye can see a much greater dynamic range of contrast than the camera is able to record, so a scene that looks good to you might not work well in an exposure. On a bright, sunny afternoon, your eye might see a person standing in the shadows under trees, and also see the brightly-lit grass and bright blue sky in the direct sunlight, but if you snap a photo, chances are the bright parts will be overexposed, or the dark parts will be underexposed, because the camera won’t be able to capture detail from both ends of the dynamic range.
There are ways to deal with this problem, including the use of filters (like putting sunglasses on your camera), or multiple exposures (adjusting one exposure to capture the brightness of the sky, another to get the grass, and a third to capture what’s in the shadows, for example). When multiple exposures of a scene are captured, they can later be blended together by photo-processing software, so that the areas that were lit with different brightness can all be seen in detail, a technique known as High Dynamic Range (HDR) photography. But you need to be aware that shooting scenes with high ranges of contrast can be problematic, and require special techniques. This is one reason photographers prefer to shoot outdoor scenes in the early or late hours of the day, when the sun is low and not nearly as bright. (It’s also often a much more pleasing color.)
I’ll post about using filters and HDR techniques another time. For now, just remember that your camera’s ability to capture an exposure is limited by the dynamic range of contrast between the brightest and darkest parts of the scene.
Here are some examples of different exposures, illustrating the difficulties that can occur in scenes with large amounts of contrast.
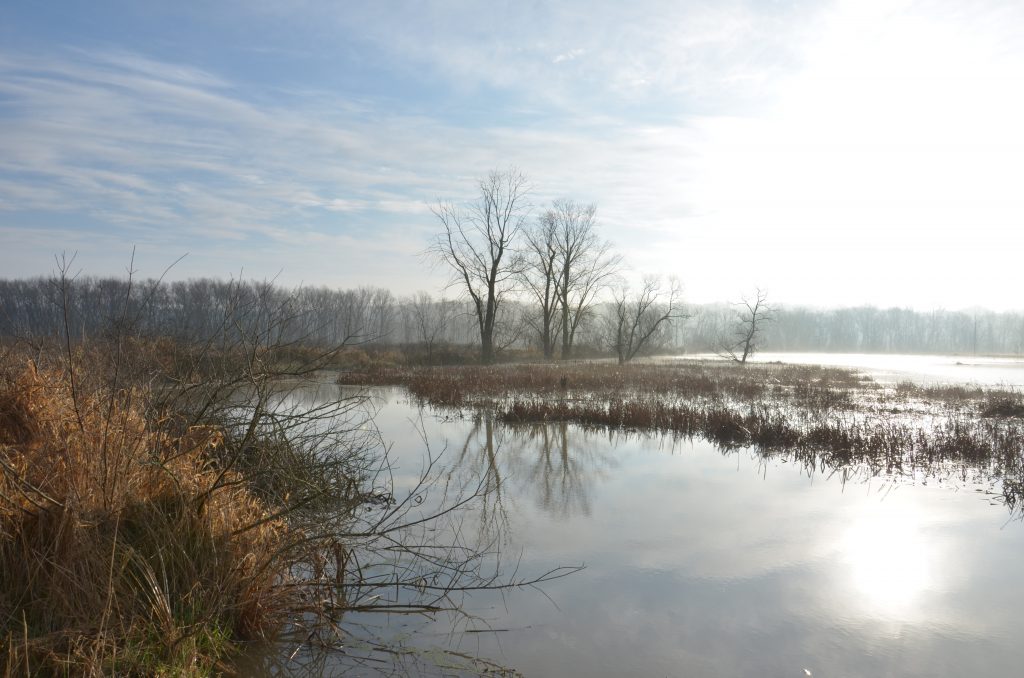
In this photo of Killbuck Marsh in the early morning, the right side is very badly overexposed because of the bright sun and its reflection in the water. The left side, with the rushes below and blue sky above, is properly exposed, neither too dark nor too light. These are the exposure settings that were used: 1/250″ @ f/11, ISO-100.
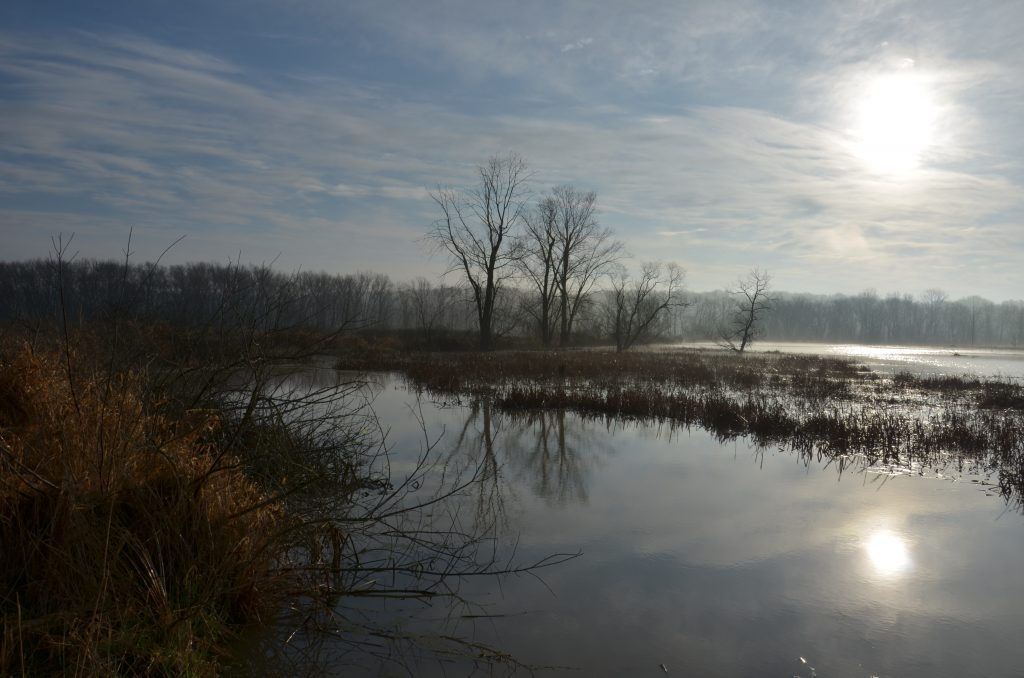
In this shot, taken shortly after the previous photo, the right side is much better but the left side is very badly underexposed. Note that the shutter speed is now 1/1000″, 2 full stops faster than the previous shot. 1/1000″ @ f/11, ISO-100
There was no possible combination of exposure settings that would have adequately captured both the left and right sides of this scene in a single image. So I used four different exposures, spaced apart in increments 2/3 of a stop to cover a total 2-stop range (with shutter speeds of 1/250″, 1/400″, 1/640″, and 1/1000″), and then later merged them in post-processing to create this HDR composite image.

You can see that the composite of the four images looks much better, with both sides retaining good detail. The sun itself, and its reflection, are still very bright, but look natural, while the left side of the image is properly exposed, with good color and detail. When the dynamic range of contrast in a scene is beyond what the camera can adequately capture in one image, capturing multiple images with different exposures for the different portions of the scene can sometimes provide a way to get the final image you want.
If you know the three legs of the exposure triangle, and understand how to adjust one in order to compensate for a change in another, you’ll be able to take control of each exposure and make photos that go beyond the generic, standardized exposures governed by the camera’s computer in full auto mode. After all, you’re smarter than the camera, and if you’re serious about your photography, it should be you who’s in charge of each exposure.